Julian J. Bunn
After enjoying Bill Waslo's articles on the IMP system1, I realised that the Sound Blaster card I had recently installed in my PC might be quite capable of performing similar analysis functions, under software control. I drew up some specifications for a suitable program, which included facilities for measuring both loudspeaker and amplifier response as a function of frequency, the possibility of subtracting the two, an oscilloscope-like display of the audio signals being picked up by the card, a graphical display of the frequency response and some means of adjusting the range of frequencies that would be covered. To restrict the portion of the digitised signal to exclude the part caused by reverberation in the listening room, the tool had to allow the signal to be "windowed" by adjusting graphics markers on the display. I was interested in measuring response to pulse signals and also to signals from a test CD, for example sine tones, "pink" and "white" noise, and so on. Whereas the pulse analysis would require averaging in the time domain, to reject background, these other signals would require averaging in the frequency domain. An important facility was to be able to switch between the two. Finally, I listed a requirement that the lowest resolvable frequency should be adjustable, maybe at the expense of data acquisition speed. The result was a program I have chosen to call AIRR, short for Anechoic and In-Room Measurement.
Despite not being as complete or professional a tool as the IMP, a PC with a sound card, running AIRR, will allow quite sophisticated audio response measurements to be made. It may therefore be attractive to some readers as a "Poor man's IMP". (I avoided the temptation of naming the program PIMP!)
To make use of the program, you will need a PC running DOS, a Sound Blaster (or compatible) sound card, EGA or VGA graphics, a microphone (usually supplied with the sound card), and about 500 kBytes of free disk space. A maths co-processor is not required. The faster your machine, the better the results from AIRR will be.
Principle of Operation
Readers of the IMP articles in Speaker Builder magazine will be familiar with the basic principle employed by AIRR, which is to produce a single pulse of very small width and then feed it to the audio system to be measured. The sound reproduced by the audio system is then picked up, using either a microphone or a direct electrical connection, and digitised by the sound card. The data so obtained are passed to a Fast Fourier Transform, and the frequency decomposition of the sound is obtained. This is then plotted in a graphics window on the PC, using the traditional logarithmic axes.
What exactly is a Sound Card?
A sound card is a printed circuit board that sits in a slot on the motherboard of a personal computer and allows both recording and playback of digital sound. The card is often purchased as a package of parts that includes the electronics, a microphone, connecting leads and a bundle of software. The board itself will sport a sophisticated line-up that comprises analogue to digital converter (ADC), digital to analogue converter (DAC), frequency modulation (FM) and mixer chips2. These days, the digital components are predominantly available in 16 bit versions (one talks of having a Ň16 bit cardÓ), although 8 bit cards are still available and may be picked up very cheaply. Typical use of a sound card is for sound "bite" playback, and multimedia applications like games, voice recognition, document annotation by voice, interfacing to a CD drive in the PC, and so on.
Happily, the sound card may also be interfaced to and controlled by custom built software. Sounds picked up by the microphone, after on-board digitisation by the ADC, can be processed in just about any way that we wish. By suitably programming the on-board mixer, the signals from the Line In socket on the card can be treated instead of those from the microphone, or the two inputs can be mixed together. Conversely, by programming the DAC, any desired waveform may be synthesized and fed to the Line Out socket. (There is, however, some upper limit on the frequency of the signals that may be produced; I will cover this point later under Pulse Generation and Collection). So, for a modest outlay of a hundred dollars or so we have a piece of equipment that we can use to perform arbitrarily complex digital signal processing.
Programmer Woes
Unfortunately, it's not quite as straightforward as that! Sound cards are notoriously difficult to configure correctly, and it is rumoured that over 50% of sound cards are returned "broken" to the vendor because of configuration errors. Why is this so? The answer is that the software drivers that come with the card, and which take care of how data are transferred to and from the electronics, require several pieces of configuration information that have to be correctly specified before the card will function correctly and, moreover, not interfere with other peripherals in the computer. The installer is presented with an often confusing choice of Interrupt Request Lines (IRQs), Direct Memory Addresses (DMAs), and I/O Address possibilities by the configuration utilities, all of which must be set correctly. In particularly unpleasant cases, the installer may even be faced with changing jumper settings on the board itself, if these are found to conflict with other equipment settings. Even once installed correctly, there may be problems such as insufficient memory for running CD-based multimedia sound applications, ŇchoppyÓ audio due to badly sized buffers, and so on3.
Once these problems have been dealt with, the next major hurdle to overcome is obtaining the necessary information on how to program the card. It is rare indeed to find this sort of detail in the documentation supplied with the card. Obtaining it usually involves a visit to the relevant forum on CompuServe, or downloading the appropriate FAQ (Frequently Asked Questions) list on the Internet News groups.
Finally, with a correctly configured sound card, the programming information described, and a decent language compiler for the PC, the owner is in a position to code up a custom sound application.
Calibrating the Sound Card
For the application in mind, the most important aspect of the program to address is that of calibration. Unless only very subjective results are required, we must measure accurately how fast a sound can be digitised by the card, so that we can calculate the sample rate. The sample rate achieved tells us the maximum frequency that may be resolved by the system (the lowest frequency that may be resolved is determined by the length of time we choose to gather samples over). Nyquist (of telephony theory fame) showed that for a maximum sampling frequency of W the signal bandwidth is W/2. For example, if the ADC on the card, under program control, can digitise a voltage level and move it into main memory 20,000 times a second, then the maximum resolvable frequency is 10 kHz. By calibrating the sample rate, the labels on the axes of the frequency and time plots can be positioned correctly, and we can have some confidence that a peak in the frequency response is really at the indicated frequency.
The AIRR calibration method makes use of the callable interface to the system clock on the PC to measure the time taken to read into main memory a very large number of 8 bit samples in so-called "Direct mode" ADC (as opposed to DMA mode). Using a large number of samples is important for two reasons: firstly because the interface to the system clock only returns a system time measured to the nearest hundredth of a second, and secondly because the larger the number of measurements that are made, the smaller the error on the derived calibration figure. The card is thus calibrated by a) taking a reading, T1, from the system clock, b) digitising 200,000 voltage levels in the ADC and moving them into main memory, and c) taking a final reading, T2, from the system clock. The rate is then 200000/(T2-T1). By default, the digitisings are made in blocks of 512 at a time. One block is henceforth referred to as a "sample" in the text, although it actually contains N separate measurements.
There are several factors that affect the number obtained for the rate. These include:
the speed of the CPU and memory,
the speed of the software drivers controlling the card,
the speed of the sound card electronics,
the efficiency of the machine code (the compiled program) that runs in the CPU.
To optimise the data collection rate, it is thus helpful to have a fast processor, fast memory (and plenty available), and the latest drivers from the sound card manufacturer4 . In practice, on a 386DX PC with a 40 MHz chip and 500k of spare memory, the rate normally achieved is in the region of 30,0005 digitisings per second, or in other words a maximum frequency point on the plots at 15 kHz. On machines with faster CPUs (like the 486 or Pentium series), this rate should be considerably higher. (In the next version of AIRR, I intend to improve the data collection speed by using either assembler or DMA.)
There are several ways of checking how accurate the AIRR calibration has been.
The most obvious is to feed the sound card with a sine wave signal of precisely
known frequency, such as that from a test CD or calibrated signal generator,
and observe the position of the peak that results in the frequency plot. For
this, AIRR is switched into "No Pulse" and "Frequency Averaging" mode, and the
signal sampled. Note that AIRR must be in the frequency averaging mode, since
averaging in the time domain would result in a uniformly flat signal. This is
because there is no oscilloscope-like triggering employed on the input signal,
so each sample would tend to begin at a different position on the waveform. To
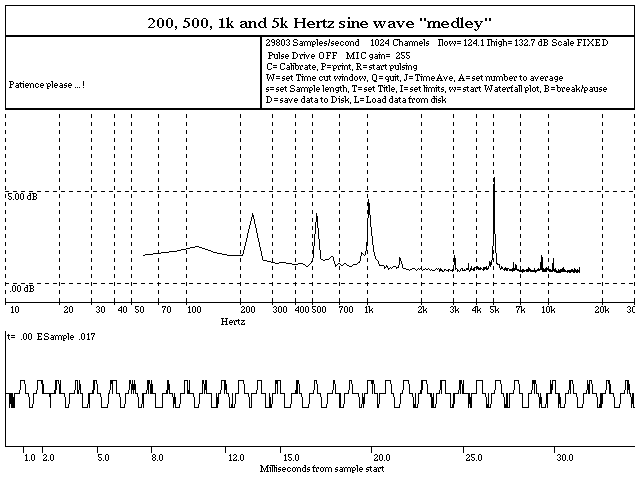
demonstrate this method, Figure 1 shows the result of frequency averaging the
sound picked up from continuous playing of four sine wave tracks of different
frequency from a test CD (the AIRR screen grabs have been converted from colour
to black and white for the purpose of including them in this article).
Figure 1
At this point it is maybe worth pointing out a couple of features of the AIRR display. The screen is divided into five different regions. The topmost box displays the title, which may be altered if desired. Beneath and to the left is an I/O box used for brief information on the current status, and also as an input box when required. Options which require you to enter text or other data use this region. For example, when specifying the number of samples over which to average, a prompt appears in the box together with the minimum and maximum values allowed as input, together with the current value. An attempt to enter anything other than a number in the correct range results in a message to that effect, and a chance to try again. To the right of this is a status box which details the current running conditions, and shows the sample rate as calculated by the last calibration pass, the number of channels/digitisings that are currently being sampled as a block, and the calculated lower and upper limits of the amplitude in the time domain plot. The following line indicates the mode of operation: this can be "room" response, "amplifier" response, no pulse or artificial feed. In "room" mode, the gain being used for the MIC input on the sound card is shown. For "amplifier" mode the gain on the Line input is shown. Then, for the pulse modes of operation, the width of the pulse appears, followed by its type (square or sin(x)/x). Immediately below these two lines of information is a list of command letters that may be typed, with a brief description of the function of each.
Next down the screen is the region devoted to the frequency response plot. Both axes are plotted on logarithmic scales. The vertical axis is continually adjusted by the program to tend towards showing the whole spectrum curve without clipping. For the waterfall plots, the vertical axis is not shown (see later for an example). Beneath the frequency plot appears the time domain plot. This shows the amplitude of the sample as a function of time in milliseconds from the start of the sample. The x-axis is re-labelled whenever a calibration is performed. Again, the vertical scale is continuously adjusted so that the whole signal appears in the plot. The positions of the time domain cut variables are shown as vertical lines and associated text: positioning the cuts is achieved by entering new values in the I/O box after selecting the appropriate option key. Also shown is the "sample energy", which is simply the integrated area beneath the sample. This is calculated by summing the absolute value of each digitising and dividing the result by the data rate: it gives some measure of the power in the pulse.
Pulse generation and Collection
A single pulse of minimal width is generated by sending a non-zero byte to the
DAC on the sound board, immediately followed by a zero byte. This causes the
analogue signal level at the DAC output to go high, then low, so reproducing a
pulse of width typically in the region of 50 microseconds, corresponding to a
first pole in the frequency domain at 20 kHz. The pulse begins its journey
through the electronic components on the sound card, and then into the attached
audio components under test. There are two main possibilities: either the
component under test is a loudspeaker and associated amplifier, or it is the
amplifier itself. In the former case, the pulse travels through the amplifier
circuitry, is reproduced as sound by the loudspeaker system, and it is in turn
converted back to an electrical signal by the microphone, and fed back into the
sound card via the Line In socket. Figure 2 shows the standard set up for
connecting the various components.
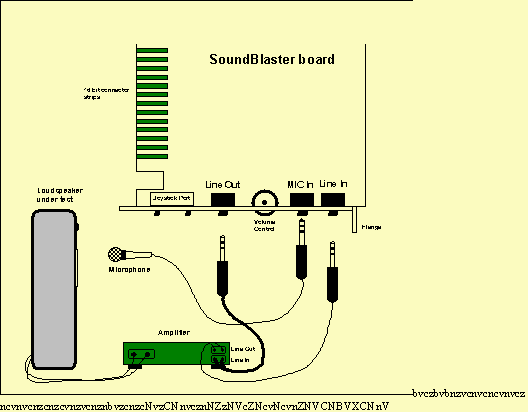
Figure 2
Signal Processing
The pulse that is picked up by the sound card is digitised into a series of 8 bit voltage levels. (The 8 bit mode is used in the current version for simplicity: the next version will benefit from 16 bit mode, although the increase in the resolution on the magnitude of the signal that this affords will not significantly affect the AIRR results.) As already mentioned, the number of digitisings that are taken of the incoming signal, and the rate at which they are gathered, determine the lowest and highest frequency components that may be resolved. For example, if the sample rate is 20,000 digitisings per second, and 1024 digitisings are taken, then we have a ŇwindowÓ on the arriving pulse that is about 1/20 of a second long, and so we can in principle resolve frequencies down to 40 Hz. In AIRR, you may select the number of digitisings that are taken to make up the ŇwindowÓ on the incoming pulse, with the restriction that this number is a power of two. This restriction simply arises from the number of data points that may be passed as a sample to the FFT. By default, AIRR uses blocks of 512, but offers a choice ranging between 16 to 4096 in powers of two. The smaller the number of data points in the ŇwindowÓ, the quicker the data are collected, and the faster the turnaround becomes. Larger sample sizes afford lower frequency measurements.
Each sample block of N digitisings is passed through the FFT which decomposes
it into a set of amplitudes in N/2 bins of frequency. ŇCutsÓ may
be placed on the incoming signal, so that effectively only a portion of it is
transformed. The amplitudes of the signal outside the cut limits are set to the
quiescent value. By default, the cut lines sit at T=0.0 and T=(Sample
Length)/(Sample Rate), so the whole sample is within the cut.
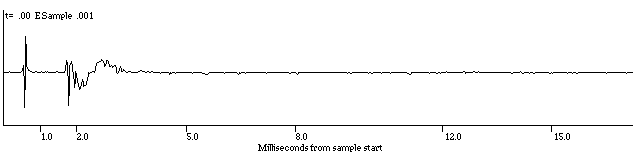
Figure 3
Figure 3 shows the AIRR results for a signal arriving at the Microphone input. Just before the pulse, an excursion from the quiescent level of the signal can be observed. This is due to cross talk between the ADC and DAC signal paths on the sound card: it is the pick-up of the outgoing pulse generated by the ADC, and is an ideal candidate for cutting using the cut lines: you might in this case specify a lower cut position at 1.0 millisecond. The upper cut line is used for excluding the part of the sample that starts from the first of the small pulses that appear at the microphone from wall reflections etc.. Making this upper cut allows AIRR to measure the anechoic response of the components under test. Without the upper cut, AIRR measures the so-called Ňin roomÓ response.
Waterfalls
The waterfall plot is useful for observing the spectral response of the system under test as a function of time: it can show up, for example, unwanted acoustic resonances in loudspeaker cabinets. The waterfall plot is generated by taking the FFT of first the whole time domain sample, then the whole sample after T seconds have elapsed, then the whole sample after twice T seconds have elapsed, and so on. Then the set of FFTs obtained is plotted on a pseudo-3D plot with time along the Z axis. Waterfall plots have already been covered in Speaker Builder6.
AIRR offers a waterfall plot option, where you may specify the length of time the Z axis should span, and the corresponding number of FFTs that should be taken over this time. The time is counted from the lower cut position, or zero, whichever is larger. The defaults are to plot 30 FFTs evenly spaced over 5 milliseconds. Figure 4 shows the waterfall plot generated by AIRR for a loudspeaker system.
The disadvantage with the waterfall plot is the time it takes to calculate and
display it. Normally, you will only invoke the waterfall plot option once a
satisfactory standard response plot has been obtained by averaging over many
sound samples.
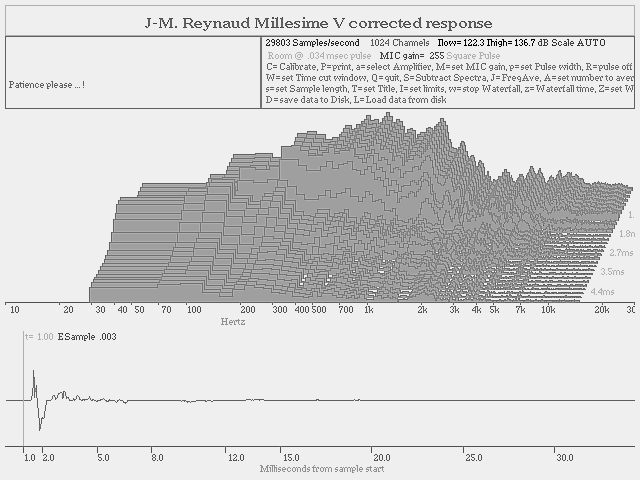
Figure 4: The waterfall plot
Subtracting Two Response Plots
When measuring the response of a loudspeaker, it is important to understand to what extent the signal is being distorted before arriving at the loudspeaker. To do this, you need to measure the response of the system up to, but not including, the loudspeaker. Then you subtract that response curve from the response curve obtained for the whole system, loudspeaker included. This leaves the desired curve (which, however, is still affected by any non-linear response due to the microphone).
The current response curve being measured can be adjusted in this way in AIRR.
Referring to Figure 2, to correct for amplifier response, you first measure the
amplifier response using the Line In source, then swap to measuring the
response using the Microphone, and then select the subtraction option, "S".
Figure 5 shows the result of subtracting an amplifier response curve from the
loudspeaker curve in this way.
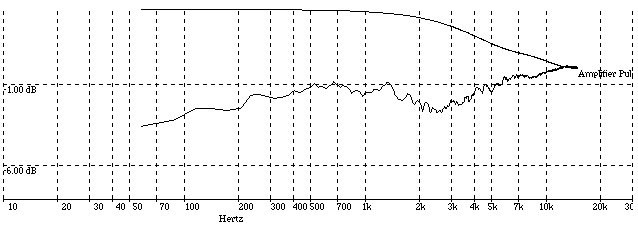
Figure 5
Storing Spectra on Disk
Frequency response data may be stored on disk for future use. The data are stored in a file as ASCII text which can then either be read back into AIRR at a later date, or imported into another tool such as a spreadsheet. When a saved response curve is read back into AIRR, it appears in grey on the same axes as the current frequency response plot, so allowing a comparison to be made easily. If the data have been stored in the file at a different resolution (sample length) than currently in use, then either interpolation between existing data points, or removal of excess data points, is performed. The restored data may be subtracted from the current data if desired. This is useful, for example, if you have a set of data points that describe the response of the microphone being used: by keeping the data in a file you can, while measuring a loudspeaker response curve, load the microphone response and then subtract it from the curve.
Modifying the Pulse Shape
There is a choice of two sorts of pulse: square, or following sin(x)/x behavior. A square wave pulse of the shortest possible duration is the default impulse used by AIRR. By shortest possible duration is meant the time taken to send the DAC high then low with two sequential high-level language instructions at maximum speed. In practice, this works out to be slightly faster than reading a sample (which also requires two sequential instructions, but to the ADC instead). Measurements indicate that the pulse duration obtained in this way is around two thirds of the duration to read one ADC digitising. To increase the width of the pulse sent by AIRR, you press "p", then enter a number, N, which is used as a multiplier. The effect is to send the DAC to a preset level, then send the same level to the DAC N-1 times, then send a zero level. If you are unsure what the response of a distortion-free audio component would be to a wide pulse of this sort, then you can see by requesting AIRR to "send" the pulse directly to the FFT. This is achieved using key-stroke "F" for artificial feed. As the width of the pulse sent increases, so the first pole of the frequency response moves downwards in frequency. By experimenting with pulses of various widths, you will observe that the shape of the frequency response curve is that of sin(x)/x.
For pulse widths which are equal to the sample length itself, the sin(x)/x curve is very apparent. It turns out that the inverse FFT of a sin(x)/x signal is just a band-limited flat spectrum. This is the interest of sin(x)/x pulses in telephony, where guaranteed bandwidth of digital signals is crucial.
The sin(x)/x pulse form offered by AIRR causes a suitable set of levels to be sent to the DAC on the card. Due to the way the current version of AIRR works, and as with wide square pulses, there is a constraint that the time taken for the first voltage excursion generated by the DAC to travel through the system and be picked up the ADC must be greater than the time taken to send the whole pulse shape to the DAC. Otherwise the digitisation of the signal will start too late to pick up the pulse start. This can be avoided by suitably reducing the width of the pulse.
Microphone Issues
The response of the microphone clearly plays a crucial role in the accuracy of the spectra obtained using AIRR. A poor microphone (one with an uneven response over the range of frequencies to be measured), is useless for making measurements with: one ends up mainly measuring the response curve of the microphone itself! The microphone that was packaged with my Sound Blaster board bears the inscription "CT329" and, just beneath, "Impedance 600 ". This is the only information I could find about it. There would be a clear advantage in using a microphone of accurately known characteristics, such as the Mitey Mike. In this case, every spectrum obtained with AIRR using the Mitey Mike could be corrected on a point by point basis using a software look-up table. The best solution would of course be to measure the response of the microphone directly, using AIRR. I confess to having no idea how this might be achieved.
A Yamaha EQ-500 graphic equalizer that I own came equipped with a microphone
for the purpose of measuring and correcting for in-room response (using a
"pink" noise generator). This microphone appears to be of good quality, and is
labelled "Electret Condenser Microphone MM-110". It is powered by a single
AA-size battery. By using it instead of the Sound Blaster microphone to make
some comparative measurements of a loudspeaker, I obtained the spectra shown in
Figure 6 and Figure 7. (These spectra were for frequency averaged "pink"
noise.) As you can see, there are significant differences!
Figure 6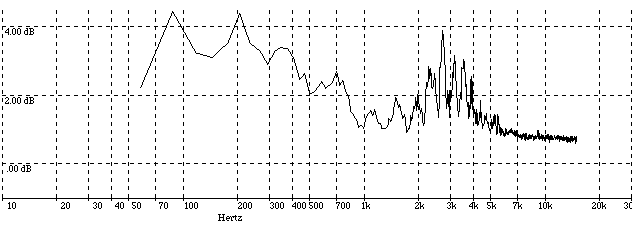
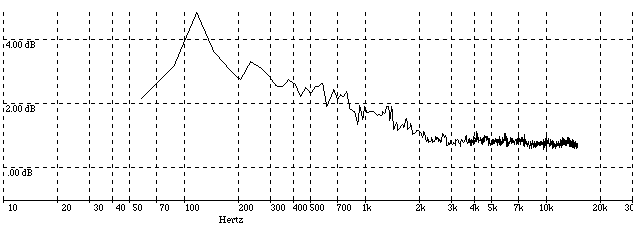
Figure 7
Quality of the Sound Blaster Electronics
Apart from the microphone, the other part of the AIRR system which might introduce non-linearities into the measurements is the quality of the electronics on the sound card itself. The frequency response of the on-board amplifiers and mixers, DAC and ADC, are all important. Without professional grade equipment to measure the response, I looked up a recent review of twenty four sound cards which was published by PC Magazine7. In this review, the results from measuring the recording and playback frequency response of each card were presented. Both of the Creative Labs Sound Blaster cards measured showed a frequency response flat to within 1 dB from 100 Hz up to 20 kHz. Signal to Noise (S/N) ratios were in the region of 70 dB, and Total Harmonic Distortion (THD) around 0.75%. Incidentally, one of the Sound Blaster cards (the "Basic Edition") was awarded the Editor's Choice.
Conclusion and Summary of AIRR Functions
The latest generation of sound cards for the PC offer the programmer a sophisticated tool with which to develop audio signal processing software. The AIRR program profits from the programming interface to a Sound Blaster card by implementing a spectral analysis function with Fast Fourier Transforms.
The scope for improvement to the initial design of AIRR is considerable; my "to-do" list includes optimising the execution speed, using DMA transfers rather than direct access commands, phase response plots, and implementing a choice between the existing square and sin(x)/x pulses, MLS (ŕ la IMP) and Pink and White Noise as the stimuli.
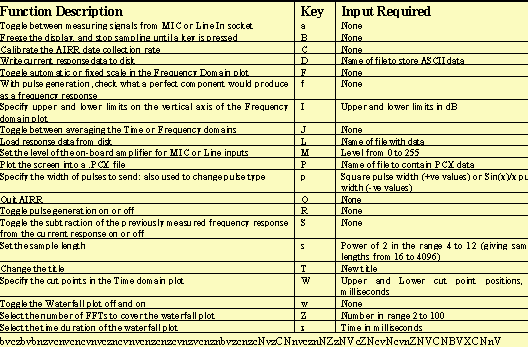
For reference, the current version of AIRR supports the set of functions show
in Table 1.
Table 1
Function Description                             Key    Input Required
Toggle between measuring signals from MIC or     a      None
Line In socket
Freeze the display, and stop sampling until a    B      None
key is pressed


Calibrate the AIRR date collection rateSelect    Cz     NoneTime in milliseconds
the time duration of the waterfall plot
Acknowledgements
As already explained, to be able to program the Sound Blaster requires a certain amount of information. I am indebted to the staff from Creative Labs who answered some of my questions on CompuServe (GO CREATIVE). In addition, I'd like to thank Ken Morse, a fellow CompuServe member with whom I bartered FFT code in exchange for an invaluable list of Sound Blaster command bytes!
3 Having said all this, you can be lucky, and find that the card slots in and works first time. Of the four cards I have personally had experience of installing, this happened just once.
4 Avoid loading the drivers "high" or using, for example, QEMM 7.0 to load the driver: I have observed very poor collection rates under these conditions.
5 A less recent version of the driver turned in a figure of 24,000 per second. 6 Bill Waslo, Letters, reply to P.P.N.Thompson, Speaker Builder, 1/94.
7 John R.Quinn, "Big Audio Dynamite", PC Magazine, Vol. 13. No. 7, April 1994.